Thursday, 30 May 2013

How to Identify Your photos using Google Images Search

This may happened with you that photographed a landscape or a tourist attraction but couldn’t recall the location? But now you have a solution, you can use Google Images search and find similar objects and relevant information.
 
This can be done in three ways: you can drag and drop the photo into the Google search bar, click on the camera icon in the search bar and then upload the image, or enter the URL of the photo by clicking on the camera icon. The results are different from the usual image search.
 
Apart from images, related websites are also displayed. Using computer-aided detection, textures, colours and much more are converted into mathematical models and compared with the known images. In addition, similar text descriptions are determined using related images. In this way, the service then determines the topic. The hit list therefore consists of optically and/or textually-related links.

Tuesday, 28 May 2013

Inspiring People: Random Interesting Facts

Inspiring People: Random Interesting Facts

How to Get Better Shots in Poor Lighting Conditions

In very low-light conditions, the built-in flash is not of much use even in high-end cameras. The flash is effective only up to a few meters away but it overexposes nearby objects and leaves farther objects underexposed. Thus it is good idea to disable the flash and use high ISO values. This induces noise but ensures that maximum light is captured. Set the lens at the widest angle so that you don’t lose light due to zoom. If supported by your camera, set the focus to infinity. Alternatively, you can use a larger aperture or lower the shutter speed. Be warned though: larger apertures will shrink the focus area and result in shallower depth of field (background blur). If the scene has no moving subjects/objects, using slow shutter speed makes sense. However, you should use a tripod for this or place the camera on a flat surface so that it doesn’t move. Use the self-timer to avoid shake during shutter release.

Monday, 27 May 2013

How to Use SDXC Cards Even in Windows XP

SDXC cards run on the ExFAT file system that was developed by Microsoft for Flash drives. Windows 7 supports ExFAT by default and Windows Vista added support with Service Pack 1. If
you’re a Windows XP user, you must run a patch that can be downloaded for free from support.microsoft.com/kb/955704.

Sunday, 26 May 2013

How to Convert Photos to Black and White

Nature photos looks great in colour, but if you like nature photos in B&W than here is a trick to do so. Many landscape shots are mostly green (depending on the scenery). After converting your image into monochrome via the Channel Mixer and boosting the contrast in Photoshop, an important step is vignetting. To do this, create a new layer, fill it with white and apply heavy vignetting using “Filter | Lens correction”. Merge both layers using the ‘Multiply’ mode. You can adjust the intensity of the vignette with the help of the opacity slider.

Saturday, 25 May 2013

How to get Image Stabilisation to Avoid Blurring

Regardless of how firmly you hold your camera, with long shutter speeds, your photos will never be 100 percent sharp and will instead look blurred. The image stabiliser is one remedy to this problem. However, it is important to know how the image stabilisation mechanism functions to be able to counter shaky hands.
 
Digital image stabilisation uses the image processor to reduce blur. Optical image stabilisation is more effective, thereby allowing you to get steady shots at shutter speeds as low as 1/10 sec. While purchasing a digital camera or a telephoto lens, you should give preference to models armed with optical image stabilization.

Friday, 24 May 2013

How to Remain Undisturbed, Yet Always Accessible on iPhone

May be it is practical to always be available, but it can be irritating for you to be constantly notified of new emails, messages or status updates. Of course, you can switch off your phone or set it to flight mode, but that would render you completely inaccessible. Even switching to silent mode or with only vibration active does solve the problem to an extent, but just for you and not for those trying to reach you.
But iOS 6's “Do not disturb” function gives you a way out. It helps you to determine whom you want to be accessible to; you'll find it in the "Settings" menu. An icon stating the function is active will now be displayed in the status bar with a moon symbol. However, its configuration menu is somewhat hidden. Go to "Messages | Do not disturb" and activate the button "Scheduled" and tap on the displayed time domain. In the following dialogue, you can define the hours of the day you want this mode to go into effect. The setting "Allow calls from" might be more meaningful with the selection "Favorites". You will only receive calls from those whom you have classified as "Favorites" in your contacts when the DnD mode is active.

How to Clean the Installed Apps List in Android

Many apps tend to accumulate over a period of time, but Google recognizes them and continues to show them in the section "Other apps" in the Play Store. That makes complete sense for paid apps which you have bought, but it might be unnecessary for a lot of free apps.
To clean this list, open Google Play on your mobile, and on the top right, tap on the Settings option and select ‘My apps’. In the view, select ‘All’. Apps that are not installed any more can then be removed. You can select an app that is still installed by touching the icon and selecting the ‘Uninstall’ option on the following page. The app will then be marked in the list to the right with a crossed circle. Several apps can be marked simultaneously by tapping and holding any one initially. Then simply tap on the delete symbol on the top right and confirm the question for removal.

Wednesday, 22 May 2013

How to Arrange Apps as You Wish in Android

Android frequently shows installed apps in the alphabetical order in the app drawer. This makes searching through apps easier, but is not necessarily useful for everyone. A personal, individually adjusted sorting sequence is more sensible. Once you're in the app drawer, tap on the right or left (depending the model) upper part above the icons and select “Customizable grid” in the menu. You can change it back to “Alphabetical” if you wish. The version “Most used” brings your favorite apps to the front, but is less recommended since the sorting changes dynamically and can complicate access. Some launchers give you an option to create folders and categories your apps as you see fit. Others have options that can be
accessed using the Menu option from the Android action bar i.e. the symbol with three parallel lines. Here, you’ll able to thoroughly personalize the layout by dragging the app icons to their desired positions. Other symbols are re-ordered automatically as you do this. These features aren’t prevalent across Android UIs or launchers and each could have its own options to customize and sequence your apps.

Tuesday, 21 May 2013

How to Share Your Exact Location Information with Tweets

You can transmit your actual geographical position directly with every tweet. To do so, log into your Twitter account, click on the cog wheel symbol and select ‘Settings’. Here, activate the option ‘Add a location to my Tweets’ and confirm by clicking on ‘Save changes’. Do keep in mind that when using your home computer, the location is determined based on the IP, so the information could be rather vague.

Moreover, if you are tweeting via your smartphone, then the location is determined by the mobile GPS and is accurate. You can also see your exact location on Google Maps.

Monday, 20 May 2013

How Transfer photos from Instagram to Flickr

This solution is for those who use Instagram to shoot pictures with their smartphone and then upload it to Flickr, there is now an easy way out. Instead of manually downloading and uploading your photos, you can use Flickstagram, a service that syncs your Instagram and Flickr accounts easily.
Go to Flickstagram, and log-in with your Instagram account and then click on ‘Authorise’. Next, the site will ask you to log-in to your Flickr account and click on ‘Authorise’. Then select the desired privacy settings, which will be then applied to the pictures you upload. After you have done that, you can begin the transfer by clicking on ‘Go’.
The time taken will depend on the quantity of data. After the process is complete, your Flickr page will have your pictures in a new album called ‘Instagram Pictures’. The best part of the service is that it also transfers all the additional information like the title, tags, comments and geo-information. The original data in Instagram will remain unchanged.

Sunday, 19 May 2013

How to Manage Privacy Rights for Applications in Facebook

Whatever applications you use on Facebook require access to your data to function, they need to access only a certain amount of data and not all of it. More often than not, we don’t really bother to check what permissions the app is seeking and simply grant it whatever rights it asks for. There have been several instances in the past of apps misusing the users’ data.

Fortunately, Facebook gives you an option to review the permissions you grant an app, see whether it is necessary and if not, revoke them. To revoke permissions, click on the ‘App

Centre’ link on the left hand side of your Facebook home screen. On clicking it, you will be directed to the App Store. On the left hand side of the new page you will find the ‘Your Apps’ list with all the apps you are using. Underneath every app you will find the option

‘Visit Website’ and ‘Settings’. Click on ‘Settings’, and you will see an option: ‘This app needs’. This will basically tell you the data that the app needs to access to function. There is another option—‘This app can also’—which is basically all your data that the app has access to, which it may not require. You can deny access to individual requests by clicking on the cross next to it. On the Facebook apps for Android or iOS, the same information can be accessed by double-tapping on the menu to the left and then going to ‘Privacy Settings’. Here you will find the ‘Apps’ option; you can then check what data the apps have access to.

Saturday, 18 May 2013

How to Poke Friends from Your iPhone

Facebook ‘Poke’ is a popular way to quickly say "Hi!" to a friend on Facebook. While the feature is easily available on the full-fledged website, the same is not the true when it comes to using it on a smartphone. You can ‘Poke’ only the friends whom you are connected with.
To 'Poke' a friend, on Facebook click on the symbol on the top left corner and type the friend's name in the search field. Tap on their name to go on their profile page. Now click on the ‘More Options’ icon on the top right corner. Here, you'll find the ‘Poke’ option along with additional options like ‘Call’, ‘Text’ and ‘SMS’. You can view the received ‘Pokes’ in the notification on the left hand corner and reply to them from here. Apart from this, you can even download the Facebook Poke app from the App Store. However, its usage is restricted only to friends who use an iOS device.

Friday, 17 May 2013

How to Browse through the Windows Store Without the App


Sometime back, the only way to access the contents of the Windows Store was by means of an app in Windows 8. If you want an overview of the Store's more than 45,000 apps, but don't have Windows 8 installed, you don't really need to install Windows 8. You can now manage to do so free of cost with the help of the website MetroStore Scanner. Open the webpage www.metrostore.Preweb.sk. The search function with the field "Filter" lets you search for specific apps. Using the menu filter, the view can be restricted to the apps available in India under "Country" and with the setting "en-in". The filter "Type" enables you to select from categories like Finance, Games or Social.


Thursday, 16 May 2013

How to Repair Problematic Recycle Bin

There are chances that due to some system error recycle bin stops functioning all of sudden. The windows error notification with the option to empty the Recycle bin does not help any more. What's more, each delete process is accompanied by an error. To solve this problem, manually delete the hidden system folder; it will be automatically re-created without errors by Windows.
You need to open a command line with administrative rights to access the system folder. To do this, type in "cmd" in the Start menu, click on the result "cmd.exe" with the right mouse button, and then select "Run as administrator". Confirm the User Account Control dialogue box. Now using the command line, change to the parent folder of the concerned drive.
In XP, the hidden folder is called "Recycler", and from Vista onwards "$RECYCLE.BIN". To make Windows show this folder, use the command "dir/a". If your system has multiple Windows installations, you might find both kinds of Recycle bin folders, but you must delete the one which belongs to the OS with the problem. For this, use a similar command: "rd /s /q $RECYCLE.BIN". Pay attention to the exact capitalization in case of the folder names, because the system will otherwise not find the folder. If the access is denied, it is possible that you do not have administrative access.
On the system drive, the Recycle bin is blocked by Windows and you must start the system in Secure Mode to be able to perform the described steps. Delete the relevant folders from all the relevant drives. Windows will re-create the Recycle bin folders when the system starts next and you can use it again.

Wednesday, 15 May 2013

How to Configure Auto-Complete in Internet Explorer

When you type in the address bar of Internet Explorer, some websites that you visited previously are suggested. This behaviour remains in effect even when you have deleted the browsing history. This phenomenon results from the rather close connection Internet Explorer has with Windows search. Here, visited web pages are also suggested and options from the index are suggested when similar URLs are being typed in. This functional expansion exists in Internet Explorer 8 and even in Windows XP, despite Windows search being installed as an extra. Those who do not want their browsing history to be suggested can do away with this integration.
For this, open "Extras | Internet options" in Internet Explorer or click on the Settings symbol and then on "Internet options". Now click on the "Contents" tabs and then on the "Settings" button under "Auto-complete". Deactivate the option "Windows search for better search results" as well as—if available—"Suggest URLs". Further, you can choose to delete the auto-complete history and carry out adjustments in the following dialogue.

Tuesday, 14 May 2013

How to Set a Slideshow as the Desktop Background

A slideshow of current image folders can be set as the desktop background by using the option "Change all images". The images are changed with a short crossfade by default. The time interval for replacing the individual images can be configured in the Registry. For this, type "regedit" in the Start menu, press the Enter key and click "Yes" on the User Account Control dialogue box. Once the Registry Editor opens, navigate to the key "HKEY_CURRENT_USER\Control Panel\Personalization\
Desktop Slideshow". Now click in the right side panel and generate the new entry "AnimationDuration" with the command "Edit | New | DWORDvalue".
 
Now open the new value with a double-click for editing. Change the base to "Decimal" and enter the desired duration in milliseconds. For example, a value of "0" will result in an immediate change without any animations and a value of "5000" will result in a smooth cross-fade animation. Confi rm your changes with "OK" and close the registry editor. The changes will be eff ective immediately.

Monday, 13 May 2013

How to View the Status of Drives and SSDs in Detail


Data loss due to problematic hard drives is very frustrating. In order to prevent it, you should regularly check the status of your drives by perusing the internal SMART values. Look for the entry “Error-free” in the Control Panel under “System and Security | Management | Computer management | Disk management”. This entry denotes that there is nothing wrong with your system. However, you can perform a more accurate test using the application CrystalDiskInfo. It automatically analyses all the accessible drives and represents them according to their status and current temperature.

Besides some information about the interface and the serial number, you will fi nd data about the drives' operating hours and startup operations. In case of SSD drives, the “Host write processes” field will be listed in terabytes and should be noted. The other area shows the SMART parameters read from the hardware. You can choose to view the results in decimal values by using the command “Options | Additional Options | Hex-value | 10 [DEC]”.

In the list, the column “Hex value” shows the raw data, while the “Current value” field shows the data normalized in relation to a “Limit value”. In case of drives, “Reallocated sectors” occasionally emerge. This may indicate user interface problems and even imminent breakdowns. Even if the drive itself evaluates the value as good (higher than limit value), you should carefully observe any developments. You can set the tool to run at start-up and even send you notifications via e-mail. A detailed evaluation of individual SMART values is diffi cult, but is not required in most cases. If you want to explore this topic further, a look at Wikipedia may prove to be useful:

Sunday, 12 May 2013

How to View the Password of the WiFi Network Your Computers is Connected to?


It’s easy to view the password for the WiFi network your computers connected. Right-click on the network symbol in the taskbar, open “Open Network and Sharing Center” and click the link “Manage Wireless networks”. In the next dialogue, right-click on the relevant wireless network and select the context command “Properties”. Switch to the “Security” tab and then activate the option “Show characters”. The “Security key” field will show the WiFi network's Password

Saturday, 11 May 2013

How to Search Hidden folders in Windows

Here is a way to search hidden folders in Windows:


You can simply type “attributes:2” in the search box of any Windows Explorer window to find all hidden objects within the currently open folder. Do this in each drive to bring up a list of hidden fi les and folders (assuming you have now turned on the option to display hidden objects, which can be found in the ‘Organize’ menu). If that doesn’t help, you can also open a command prompt window, navigate to each drive’s root, and use the following command: “dir /ah /s /p” to display all hidden objects in all subfolders page by page, or “dir *. /ah /s /p” to restrict the result only to folders. If you have some idea where your folders are, search within those folders so that you exclude the hundreds of Windows system fi les which are also hidden.
 

Tuesday, 7 May 2013

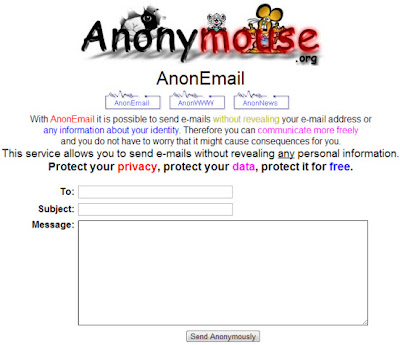
How to Send Anonymous / Unknown Emails Without Getting Tracked

Here is a way to send Email Anonymously without getting tracked:

To send an Anonymous Email, open the Anonymouse website from Here.


Important Note:

 1. Please do not use this web service for any Illegal purpose, harassment, threats or spam.
 2. You cannot attach anything with an email.
 3. You cannot send an email to Multiple people at a time.
 4. The emails will be in the Text format, means you cannot insert any pictures etc. in it
 5. You will not get the replies from the Recipient at all.
 6. Emails will be delivered within 12 hours.


Top 10 Educational websites in India

Here is a list of top 10 educational websites in India:

1. www.meritnation.com

2. Minglebox.com

3. IndiaStudyChannel.com

4. Pagalguy.com

5. Caclubindia.com

6. Winentrance.com

7. Successcds.com

8. Way2k.com

9. Pagalguy.com

10. Learnhub.com

So take help of these websites to brighten your future.

Monday, 6 May 2013

Top 10 online shopping websites in india

Searching for the best online shopping websites in India. Online shopping has been growing very fast in India, only in 2012 online shopping e-commerce website number has crossed 600 from 100 . Online shopping offers fast, easy, money saving and interesting shopping experience. Here is a list of top 10 online shopping websites:


1. Flipkat.com


2. Shopclues.com


3. Shopping.indiatimes.com


4. Ebay.in


5. Infibeam.com


6. Yebhi.com


7. Snapdeal.com


8. Myntra.com


9. Tradeus.com


10. Homeshop18.com

Friday, 3 May 2013

Zync Quad 10.1 inch full HD display price in India


Zync has launched Quad 10.1 inch full HD display android based tablet. The tablet to be available on the company’s official website is priced at Rs. 14,990.
The tablet comes with capacitive screen with a ten point multi-touch along with a screen resolution of 1920×1200 pixels. It runs on Android 4.1 Jelly Bean and powered by a Quad-core 1.5 GHz processor.
It consists a 5 MP rear auto focus camera with face detection and 2 MP front-facing camera for video chat. For connectivity, it has Wi-Fi (Direct, for data transfer), HDMI port and micro-USB. The tablet has a 16 GB internal storage capacity, which is expandable to 32GB via a microSD card. The tablet has a rechargeable Lithium-Ion 8000 mAh battery.
 
The tablet comes pre-loaded with e Google Play Store, Google Maps Navigation, HTML Browser, Adobe Flash, Adobe Reader, Aldiko e-Book Reader, Facebook, Twitter, LinkedIn, YouTube, GTalk, Skye, MSN Messenger. It also offers office suite with World/Excel/Powerpoint. Some of the supported games applications include Angry Birds, Fruit Ninja etc.
 
The price of the Tablet in India is Rs 14,990.
 
The key features of the Tablet are as follows:
•  Full HD 1920×1200 pixels display, Quad core processor
• Connectivity options include Bluetooth, Wi-Fi, HDMI port and micro-USB
•  A 5 MP rear camera and 2 MP front facing camera.
•  16 GB internal storage
• Quick access to popular apps Google Play Store, Google Maps Navigation, HTML Browser and many more.